Monday, May 31, 2010

Using Pivot Tables to Summarize NBA Team Salaries

The power of Excel is its ability to summarize data with an easy to use interface. The best example of this is Excel's PivotTable feature.

In order to use a PivotTable you need to have your data stored in a table. A table consists of rows of data, where each row represents one entry of data. And columns that help further define the data. For example, below is a table of data I put together, back when the Lakers were struggling and I was looking forward to free agency (My how times have changed :) ).

The first column has the player name. The second has the team name for that particular player. And the next columns are the salary that player makes in that particular NBA season.

Suppose you wanted to quickly determine how much salary dollars each team is spending in a given year, you could write a few SUMIF formulas, one for each team. However since all the data is already nice and neatly stored, you can use a PivotTable.

To do so, put your cursor anywhere in the data table, then go to the Insert Pivot Table wizard (Alt + D, P). The first screen asks you where the data you want to summarize is (either in a workbook or another data source) and whether you would like a PivotChart included as well. Select Excel as data source and just a PivotTable for now and hit next.

The wizard should have automatically selected the complete data table your cursor was sitting in (if it did not you have rows of missing data that it did not think was part of the table. You should cancel the wizard, clean your data and start over).

Lastly the wizard will ask you where you want your PivotTable to be inserted, select a new worksheet. You should start with a blank PivotTable that looks like this:

The pivot table has 4 parts to it, which are populated by the fields in your data. A field is a column of data from your original table. Filters, which live at the top of the Pivot Table, filter the data that is summarized below. Rows list all members of a field in rows. Columns list all members of the field in columns. And most importantly Values, are numerical summaries of all the filters rows & columns that have limited your data. The summaries of the values can be changed to do different statistical operations (SUM, AVERAGE, COUNT etc...)

To get our salary by team, we are going to move the 'TEAM' field into the Row area of the pivot table. And the '2008/09' field into the Value part of the pivot table. And voila, you have the following table of salaries spent in 2008/09 by team.

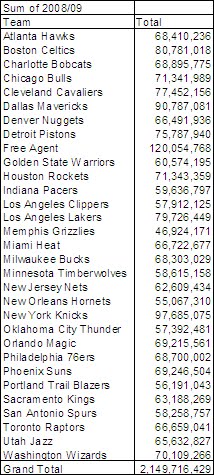
Note that since the data included Free Agents and the salary that the teams who cut them still contractually owe them. The 33 Free Agents in the data add up to the highest paid group of players in 2008/09.

As mentioned SUM is only one of the many summaries a PivotTable can compute. To find our how many players were part of each team, simply right click somewhere in the PivotTables Value section, go to Value Field Settings and in the "Summarize value field by" section select COUNT. You should get the view to the right.

Note, that the Top left area of the Pivot Table automatically includes the summarizing operation and the field it is performing on.

You can find the data and sample PivotTable here so you can play with on your own.

As always, feel free to leave me your questions comments and future blog ideas.

-Danny

Monday, May 24, 2010

Taking & Making Shortcuts in Excel

There are no shortcuts in life, but there are a whole bunch in Excel. And if for some reason it doesn't already exist, you can even make your own.

Excel shortcuts let you quickly maneuver through your window, perform procedures, access user forms or help you preform some excel action with the press of a few keystrokes.

Here is a full list of shortcuts, published by Microsoft. However, if reading through pages of information isn't your thing, here is a shortened list of all the single press shortcuts.

If an Excel shortcut does not already exist for something you do regularly, you can record a macro that does that something and assign a particular code to it.

For example, let's say you have a workbook with multiple worksheets and you always find yourself having to go to a particular sheet (maybe because that is where you keep all your assumptions). You could record a macro that always takes you to the first sheet.

In Excel 2007, you will need to make the "Developer" ribbon available by going into Home > Excel Options > Show Developer Tab in Ribbon. Before you begin recording make sure you are on a different sheet than the one you will want to always switch to. Start the record wizzard:

Give your macro a name ("AssumptionSelect") and enter a shortcut key ("CTRL" + SHIFT + H). [NOTE: be careful not to pick a shortcut that exists because you will overwrite it] Then select whether you want this macro to live ONLY in this workbook or in your instance of excel (so you can always use it, for the specific thing we are recording here you should save it to the workbook only). Click OK to start recording. Select the "Assumption" tab of your workbook and stop recording.

Now whenever you want to go to your assumption tab, just enter your shortcut keys and you are there.


Attached is a workbook that has this macro stored into it.

As always leave me your questions/comments/and future blog ideas.

-Danny

Monday, May 17, 2010

Charts: Visual Evidence

A picture says a thousand words, in Excel we call those pictures charts.

Charts are visual evidence we use to help prove an argument. The difficult part of a chart is "knowing" what you are trying to prove. You could always just start highlighting data and charting it until something looks interesting but starting with an argument makes charting much easier.

Once you know what you want to chart its just a matter of organizing the data in a table, clicking the insert table wizard and adding any additional formats that help prove your message. (Tables may sound intimidating but its just a simple, structured way of organizing data... I will explain more in a future tip)

Example (from GraphJam):
funny graphs and charts
see more Funny Graphs

The message is simple. The chart, even if the data is fictitious, proves the message "Stranger's don't like to get petted"

This is how you would make this chart.

Organize your data into a table that looks like this:


Then you will have to add Titles to the Chart & Axese. The last trick will be to format the Y Axis as a white text color before adding a text box with your custom labels to your charts drawing layer.
Here is a link to the chart recreated in Excel for you to play with.

As always, feel free to leave comments/questions/suggestions.

-Danny

Saturday, May 15, 2010

Make a Date with Excel

In commemoration of today being date night, this week’s tip is all about how Excel handles dates.

Using Excel is all about using text and numbers, and Dates in Excel are just numbers.

Today, May 15, 2010, in Excel’s world is, 40,313. Tomorrow will be 40,314. But when you see dates in Excel, it is usually smart enough to format the date exactly as you enter it (5/14/2010), but store a “serial number” in the background.

The benefit of dates being serial numbers is they are easier to manipulate. You can just add 1 to a date to show the next day. Or subtract 7 from a date to show that day last week. Or subtract 5/10/2010 from 5/3/2010 to get 7 days. (You may have to reformat your answer to make it look like just 7 otherwise you will probably get 1/7/1900 because Excel usually adds a format to your formula by taking one of the formats from a cell in the formula.)

There is a library of formulas you can use to manipulate dates. But I’ll save that tip for another day.

Note however, the first day of the world, in Excel, is 1; January 1st, 1900. So even though you can type December 31st, 1899 in as a text string, Microsoft will not recognize it as a date. To most of us that’s not a problem, but Al Gore won’t be able to chart his historical temperature data proving Global Warming…

 As always feel free to send questions/comments/tips to me to include in future Tip of the Weeks.

-Danny

Follow-Up: Special Characters

There is more than one way to skin a cat!

As a follow up on last week’s special character tip, I have 3 alternatives to using special characters that are not on the keyboard. The first two are very similar and the third could be considered a tip/trick.

1. Insert a symbol through the Window’s Character Map by going through Start>All Programs>Accessories>System tools>Character Map


2. Insert Symbol through Office Application – When you are in any of the applications you can insert a symbol directly through the application (which will resemble the Character Map above). Found by going through Insert > Symbol [Alt + I , S]

3. AutoCorrect - You can have Excel Automatically replace precise text strings with new ones. This was probably designed to keep you from typing “asses” when you meant “assess,” but we can hack it for our own use.

For example we could have Excel replace something like “~D~” with “Δ”; or something like “0163” with “£”

To get to the Auto Correct options in 2007 open up Excel’s Options [Alt + T, O] then go to the Proofing tab. In 2003, once in Excel’s Options, go to the Spelling tab. Once you are in the AutoCorrect Options… in the “Replace text as you type” dialog frame you will find two text boxes. Type the code you want to get replaced in the “Replace” box and what you would like it to be replaced with in the “With” box. Then click add. (See below)


Note: in order to get the special character in the “With” box you are going to have to FIRST insert the symbol into a cell (using Insert Symbol Form [Alt + I , S]), then Copy it to your clipboard before you can Paste it into your with box.

AutoCorrect options are available in all windows applications; however you will have to maintain the list of automatic replacements individually within each application.

Special Thanks to DCJ & Thuy Kim for inspiring a follow-up.

Remember send me your requests/tips/questions to inspire future tip of the weeks.

-Danny

Inserting Special Character with Codes


For my first installment of Excel weekly tips, I will start with a trick that helps deal with foreign currencies.

 
In all Office Programs, you can use special codes to insert special characters by:

 
Holding down 'Alt' then entering a 1-4 digit code using the number pad then releasing 'Alt'

 
Key character codes for finance folk:

 
0163 = £

0128 = €

0165 = ¥

 
Other nifty codes:

1   = ☺

2   = ☻

3   = ♥

4   = ♦

5   = ♣

6   = ♠

11 = ♂

12 = ♀

26 = →

27 = ←

 
Here is a site with a list of the four digit codes:
Character Code List


Post your questions/comments/suggestions and inspire a future blog.

-Danny